There's a growing online community of people trading ideas on alternative
energy, and I was curious to see if anyone else had built such a box. When
I Googled "building insulated cold box," I found information on the
corrosive properties of zinc, plans for constructing a cat shelter and a
treatise on building a "kegerator." Interesting stuff, all, but not what I
was looking for. It's surprising, considering the amount of ink--or just
as often, kilobytes--spilled by energy misers discussing the intricacies
of solar panels and efficient light bulbs. I even joined a Yahoo group
called Refrigerator Alternatives and heard about another interesting idea.
(See "Chest Fridge," below.) But when it came to cold boxes, we seemed to
be pioneers.
Penny and I designed a simple box, sized to fit against the
exterior casing of the door. I prebuilt the three walls using 2 x 4s and
sheathed them with 1/2-in. plywood. (The dimensions are 3 ft. wide x 16
in. deep x 7 ft. high.) I cut 2-in. rigid foam insulation, aka "pinkboard,"
to fit snugly between the 2 x 4s, then used expanding foam insulation to
fill in any gaps between the pinkboard and the frame. Over the plywood, I
installed vertical shiplap siding, mostly because it's what I had lying
around and because it matched the natural wood clapboards on our house.
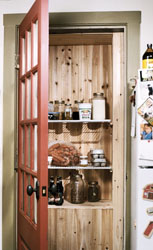
The interior of the cold box was sized to fit conventional fridge racks
(25 in. wide x 16 in. deep), which I scored for free from a local repair
shop. I lined the interior with 5/16-in. cedar paneling, attaching it to
surface-mounted nailers on the inside of the walls to increase the dead
air space. I coated the cedar with a water-based polyurethane for moisture
resistance and easy cleanup.
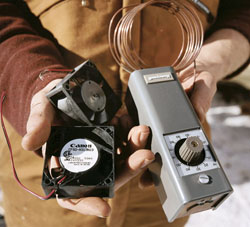
I also fitted the box with two 24-volt DC fans that are
thermostatically controlled. The fans are mounted on the outside of the
box; PVC pipe extends from each fan through the plywood, insulation and
cedar to the inside. When the temperature in the "fridge" gets too high,
the fans kick on, one sucking in cold air near the bottom of the box, the
other exhausting warm air at the top. (Eventually, I'll install an
override thermostat so that the fans won't start when the outside air temp
is above 40.) We went with DC fans and wired them directly to our battery
circuit (via a small hole drilled in our box sill) so that we could cut
our inverter and its associated efficiency loss out of the loop.
I stapled a layer of sill seal to the frame of the cold box to keep out
the drafts. I attached the unit to the house with 3-in. PrimeGuard
screws--to remove or install it, all I need is a screw gun. Once the porch
is in place, I'll mount casters on the bottom so that I can roll it in and
out of position. I'll take off the temporary roof I built over the cold
box after the porch roof is built.
I figure the whole box has an R-value of about 12: The pinkboard has an
R-value of 10; the other materials and 1-1/2 in. of air space supply the
rest. The box hasn't been in operation long enough to give a truly
educated appraisal (stay tuned to
my blog on PopularMechanics.com), although one real downside has
reared its head: There's no freezer and, thus, no storage space for cookie
dough ice cream. But the primary goal has been met. Since installing our
cold box, we've kept our perishables cool. And our generator silent.


